Getting Started with Eduscena

This tutorial will guide you through the essential steps to get started with Eduscena and set up your first school year. You'll find a helpful guide button in the lower left corner. This walkthrough follows the *Getting Started Guide*.
When you log in, you'll land on the Today page. You will see a message with instructions that will help you setup your school year. For now, we will ignore it and just follow step 1 of the guide and go to he Students page to add students.
Step 1: Register Students
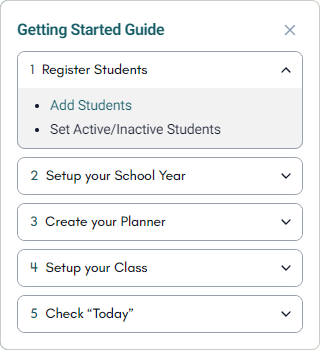
- Go: Click "Students" in the main menu or the "Add Students" link in the guide
- Action: Click the "Add Student" button in the sidebar
- Action: Fill in the form with your students information
- Option: The "Active" status is on by default. You can toggle it off if you want to setup a student but not have them count toward the current school year. Inactive students do not count toward the 5 student limit.
- Important: Add all your students before moving onto the next step.
Step 2: Setup your School Year
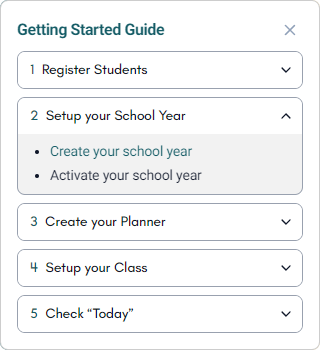
- Go: Click "School" in the main menu or the "Create your school year" link in the guide
- Action: Click on "Create School Year" button in the sidebar
- Action: Fill out each step of the form:
- Section 1: Students
- Choose the grade level of your students.
- Click "Calculate" so Eduscena can use your state and student grade levels to gather requirements.
- Click Next.
- Section 2: Year Info
- Name your School Year.
- Choose your Start Date. All lessons will be auto-scheduled starting from this date.
- Choose your End Date Type:
- Standard 180 days - Average school year duration in America.
- Custom End Date - Choose this if you want to end at a specific date regardless of any requirements.
- State-based Calculation - Only appears if your state has provided requirements. We recommend this option if it is available to you for easy compliance.
- Click Next.
- Section 3: Schedule
- Set Daily School Hours - We use this to let you know any state requirements.
- School Days - Toggle on the days of the week you want to use for school.
- Click Next.
- Section 4: Holidays
- We provide a list of U.S. Federally recognized holidays you can select from to set as non-active school days. You can modify your selections later, even when your school year is active.
- Click Next.
- Section 5: Breaks
- Create your own time off that will be set to non-active school days. You can modify your breaks any time, even when your school year is active.
- Click Next.
- Section 6: Review
- You can see the results of your information here, including the End Date.
- Click Create School Year.
- Section 1: Students
- Action: Click the "Make Active" button at the top right corner.
Step 3: Create your Planner

Step 3 and 4 are interchangeable. You can do them in any order and even go back and forth between them. If you have lesson plans you want to bring into Eduscena now, continue with these steps. If you want to create them later, while school is happening, you can skip to step 4 first. The Guide video shows what happens if you skip to step 4.
- Go: Click "Planner" in the main menu or the "Create lesson plans" link in the guide.
- Action: Click on the "Create New Plan" button in the sidebar.
- Action: Fill out each step of the form and click the "Create Lesson Plan" button.
- Action: Choose your next step
- Create Another - Open the form again to create another Lesson Plan.
- Add Content - Go to the Lesson Plan you just created so you can add lesson content and resources to it.
- Close - Closes the popup, leaving you on the Planner page.
Future link to Creating Lesson Plan Content will go here.
Step 4: Setup your Class
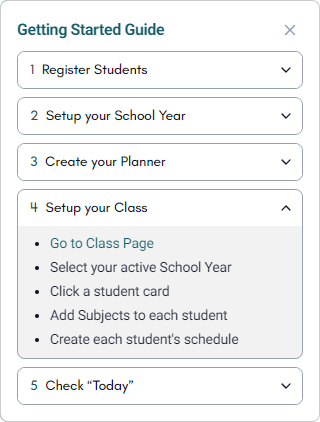
Subjects Page
- Go: Click "Class" in the main menu or the "Go to Class Page" link in the guide.
- Action: Your active school year will be selected by default.
- Action: Click on a student card to begin.
- Action: Add Subjects to your selected student
- Typical Subjects Tab
- We provide a list of subject categories that are required by your state or common for that grade level. Click the "Add Lesson Plan" button to link a Lesson Plan to a subject category your student will be learning.
- Note: While we provide State requirements, Eduscena does not enforce any requirements. You have total control to use or ignore whatever information provided.
- Custom Subjects Tab
- Use this tab to add subjects that may not be on the typical subjects list.
- Click the "Add Subject" button to choose from a list of Lesson Plans you want to use with this student. You may need to go back to step 3 and create a Lesson Plan in order for it to show up on this list.
- Typical Subjects Tab
Scheduler Page
- Go: Click on the "Scheduler" button in the sidebar.
- Option: Choose how you want to divide this students school year by clicking the "Edit" button in the School Year Division section.
- Action: Click the "Edit Schedule" button.
- Action: Read and acknowledge the warning by clicking "Continue"
- Action: Drag and drop subjects from the subjects list into the period slots of your choice.
- Note: You can remove a subject by clicking the "x" button.
- Note: You can safely drag and drop a subject from one period slot into another.
- Note: You can leave period slots empty.
- Note: You can increase the number of Periods available (up to 12)
- Note: If you divided up your school year, you should see tabs for each division. You don't have to create the schedule for future divisions immediately.
- Action: Click "Save Changes" button when done.
Step 5: Check "Today"
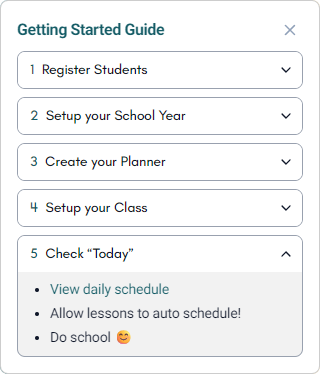
- Go: Click "Today" in the main menu or "View daily schedule" link in the guide.
- Wait: Eduscena will now begin to create your schedule and link lesson content to it.
- Action: Do school! That's it. From now on Eduscena will auto schedule 14 days ahead of the current date.
Next Steps
Now that you're set up, check out these related tutorials:
- Managing Daily Periods
- Reacting with Attendance
- Creating Effective Lesson Plans
Need help? Visit our FAQ section or contact support!